

I partnered with a local wealth management firm to address a need for visualizing investor behavior, particularly for risk-averse investors who exit the market during downturns. After creating a custom probability algorithm to generate a financial model, I developed an AI based retirement simulator. Users can forecast their financial future and generate a retirement income plan.
The application was built on the Streamlit platform. The content below is designed to help other developers and data scientists start their own applications.
The application is public on Github to enable others to utilize the source. A Jupyter Notebook was used to develop the functions and models within the retirement simulator.
I created this custom GIF in Adobe Premier Pro and included this MP4 version to allow pausing.
Creating your first Streamlit App
The easiest way to get started with Streamlit is to use GitHub Codespaces and select the sample app to speed up the process.
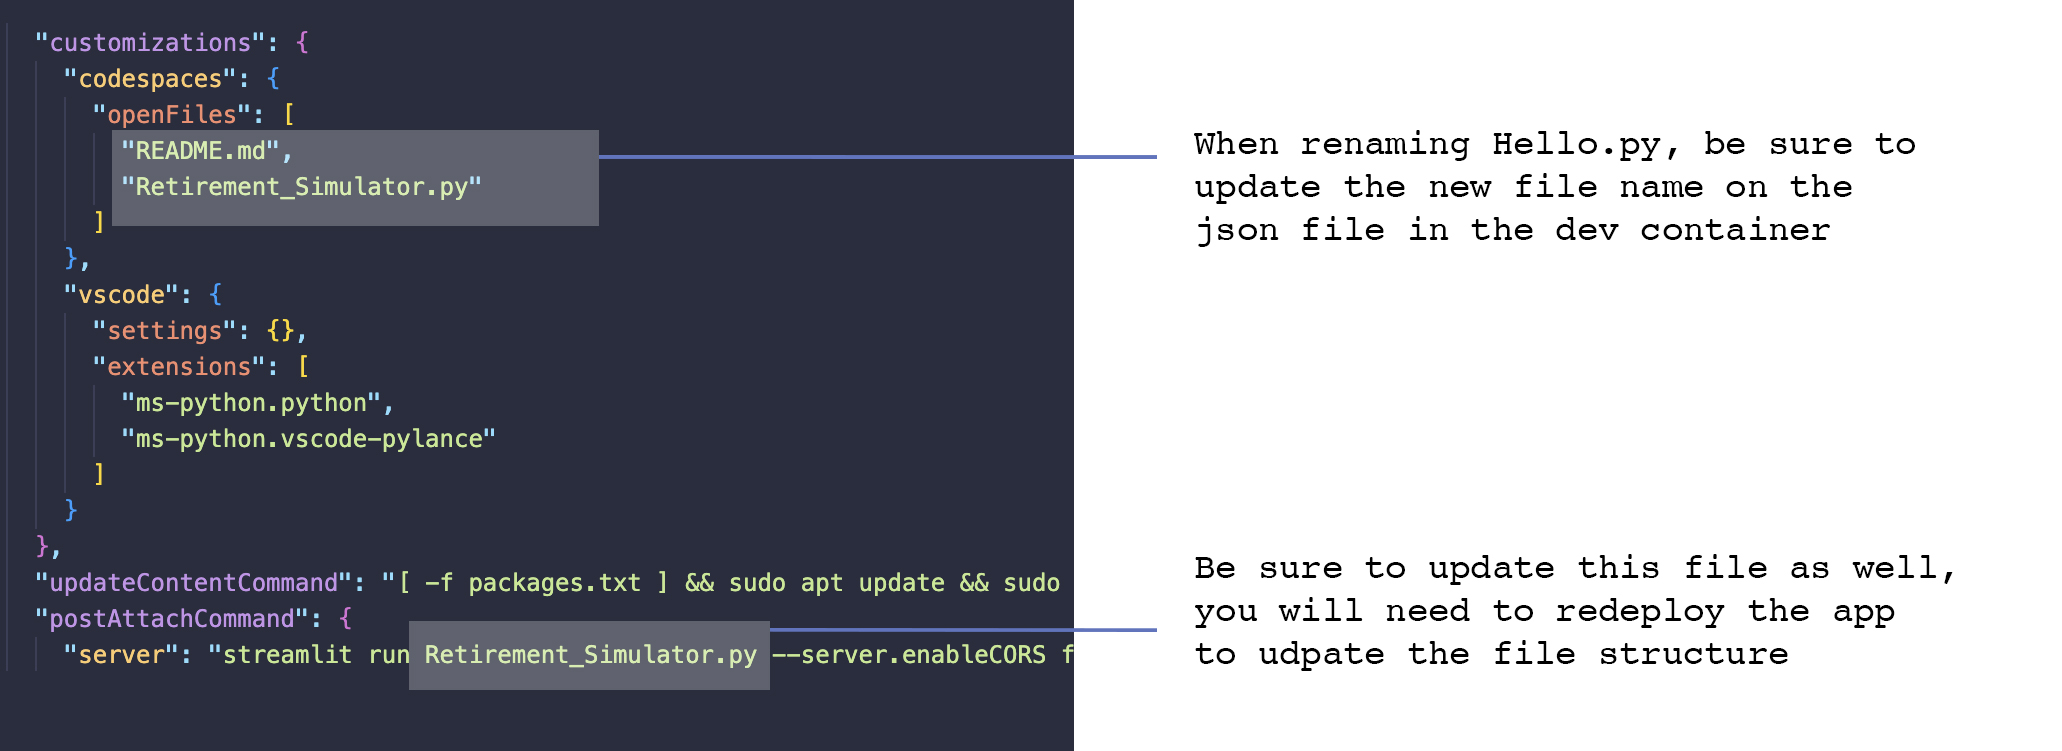
Once your Strealit app is launched, edit any included pages and rename the main “Hello.py” file. After renaming the main file, you must update the file name within the devcontainer.json file. Next, delete the app from the Streamlit login page, then relaunch the app using the same repository you created. When you relaunch, Streamlit will ask for your (newly named) main file name, enabling the correct architectural map for your app.
Tip: Renaming the main (hello.py) file is the only edit that requires relaunching the app. Page names can be changed, and .py files can be added to store functions and models without needing to re-initiate the Streamlit app.
Starting from an existing repo
If you want to save the trouble of deleting and relaunching a renamed version of “Hello.py”, fork an existing repository and make any initial edits. Upload the edited repository to GitHub and launch from this existing repo.
Choose your main file name wisely, as it will appear at the top of your navigation. For example, my main file was named “Retirement_Simulator.py”; note that the underscore appears as a space.

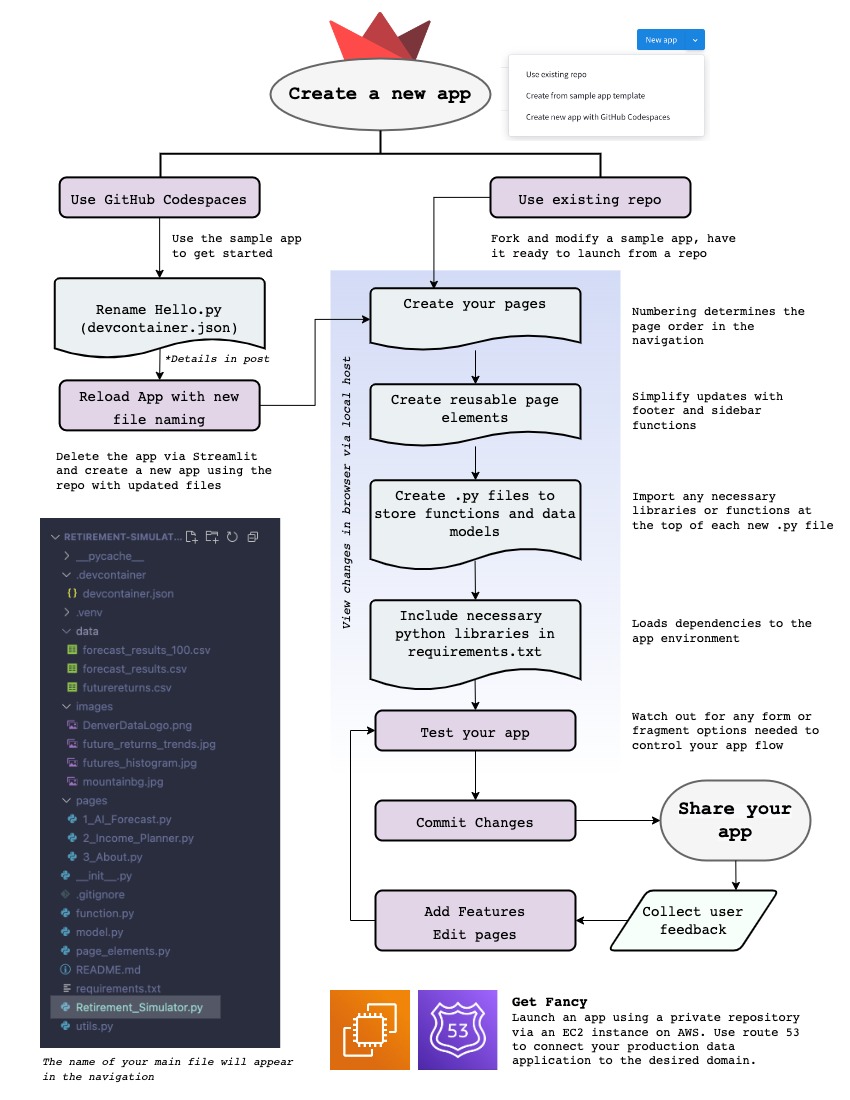
Streamlit Process Map
The VS Code image shows the organization of the retirement simulator app, including the folders housing the data and images used for the project. The remote repository was cloned to a local, desktop environment for development. The .py files were created in the Codespace environment.
Be careful with your branches. Before opening and working within the Codespace environment, any local edits need to be pushed to your remote server.
A note on sharing
The Streamlit cloud requires your repository to be viewable by others. This open design is intended to foster a collaborative effort among developers. If you are creating an app that needs to be private, I recommend utilizing an EC2 instance on AWS.
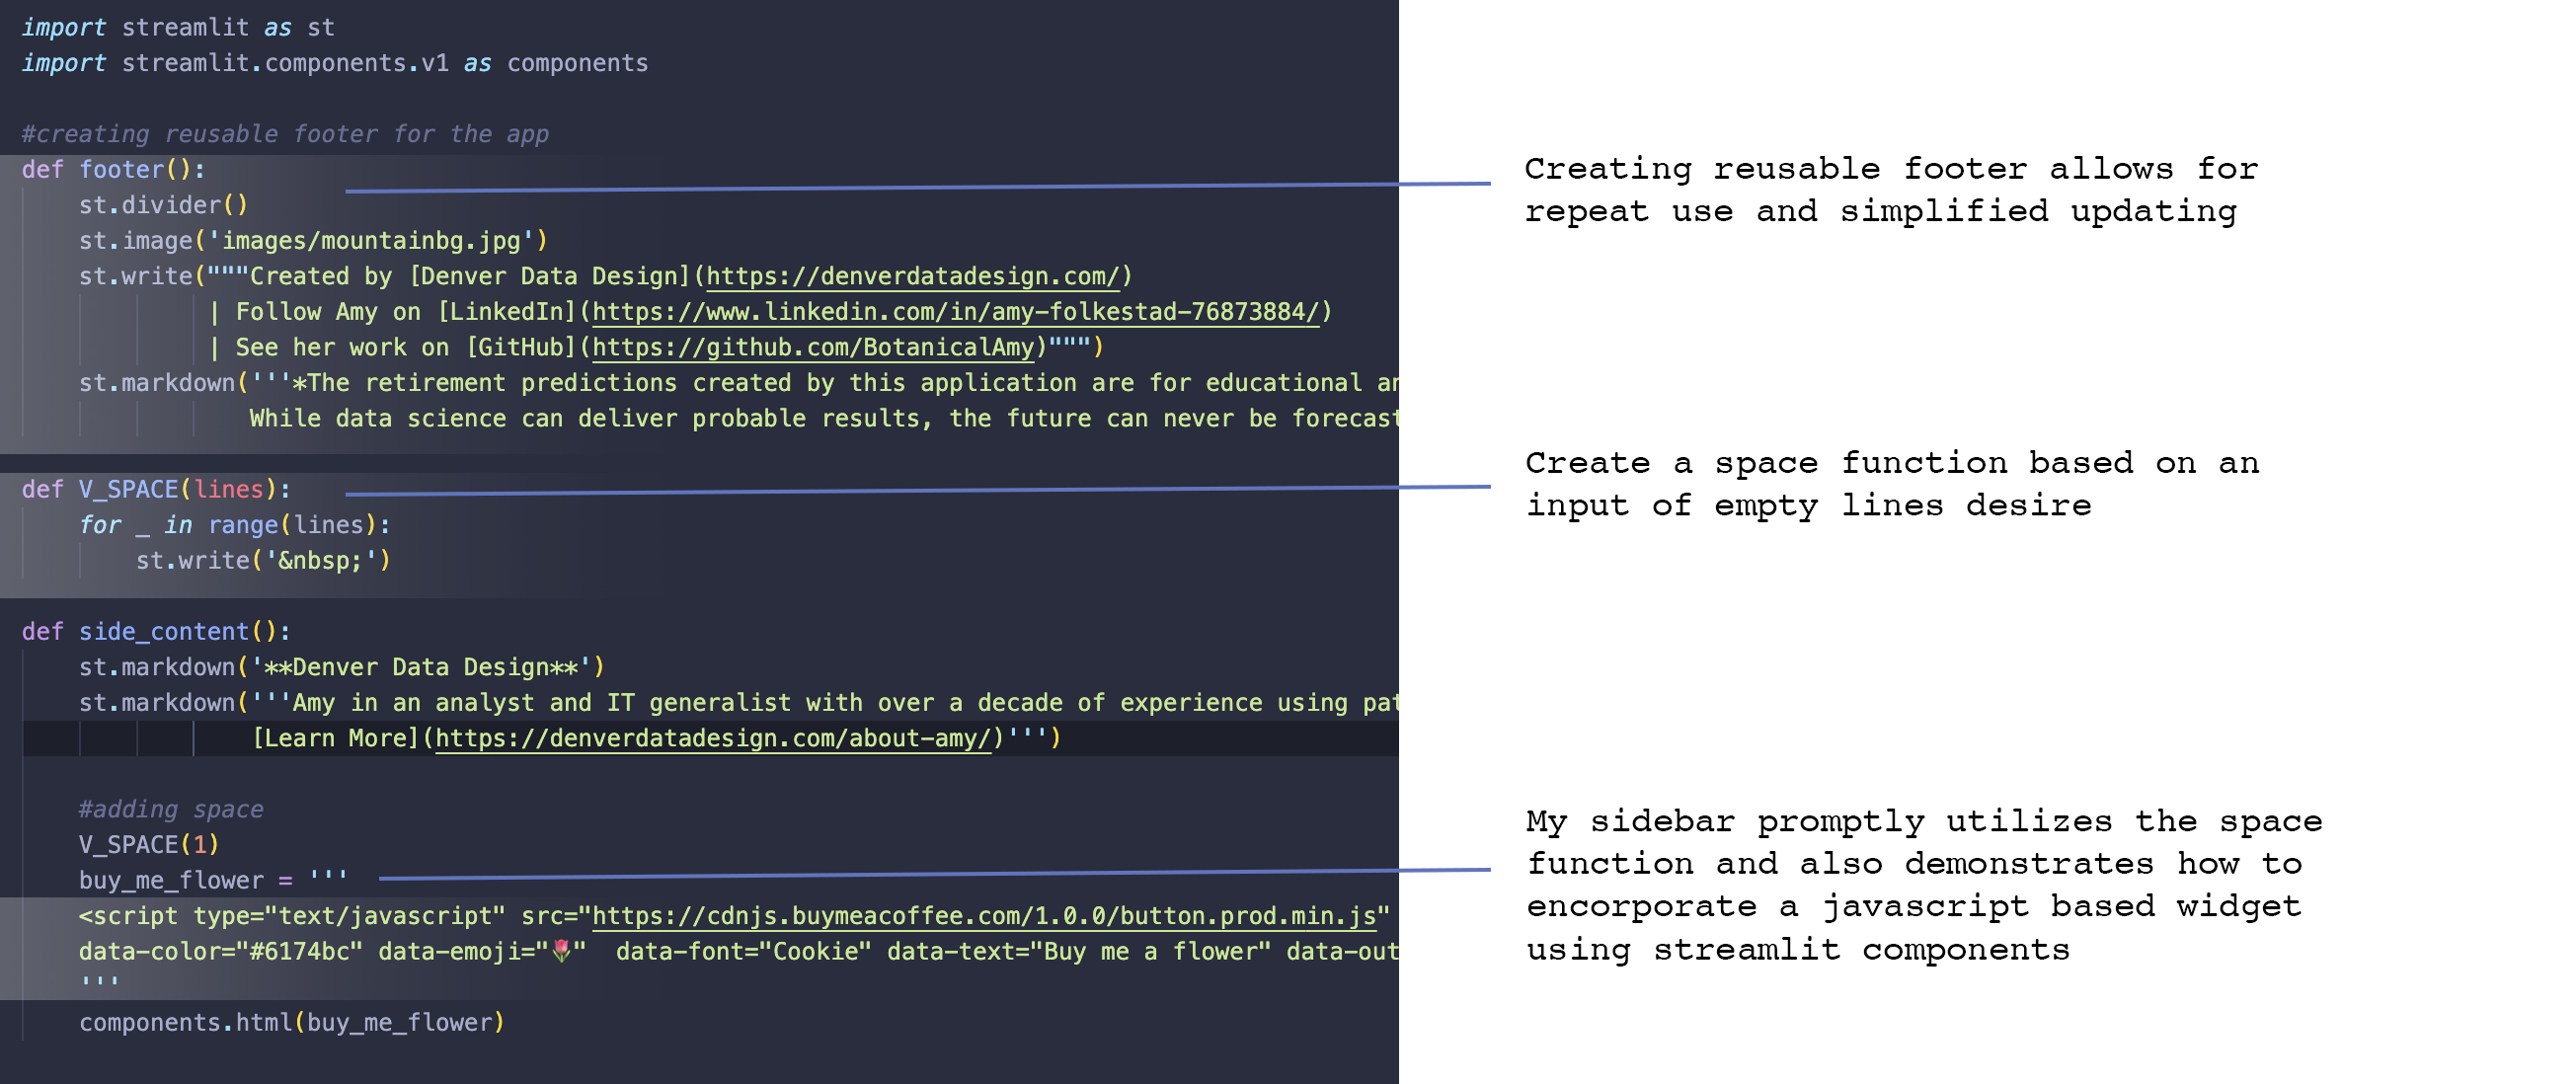
Page Elements
The page elements file, which included a footer vertical space and side content bar, was created to easily update components within the data application.
Creating a vertical space function is the best way to add padding to your Streamlit app. If you code in an empty markdown element, this will create the desired space but will automatically scroll the page down to this empty marker when loaded.
Think of the page elements as your collection of PHP based scripts. Any element that may be updated in multiple locations can be declared in this location. This could include contact information, web URLs, or any repeated widget.
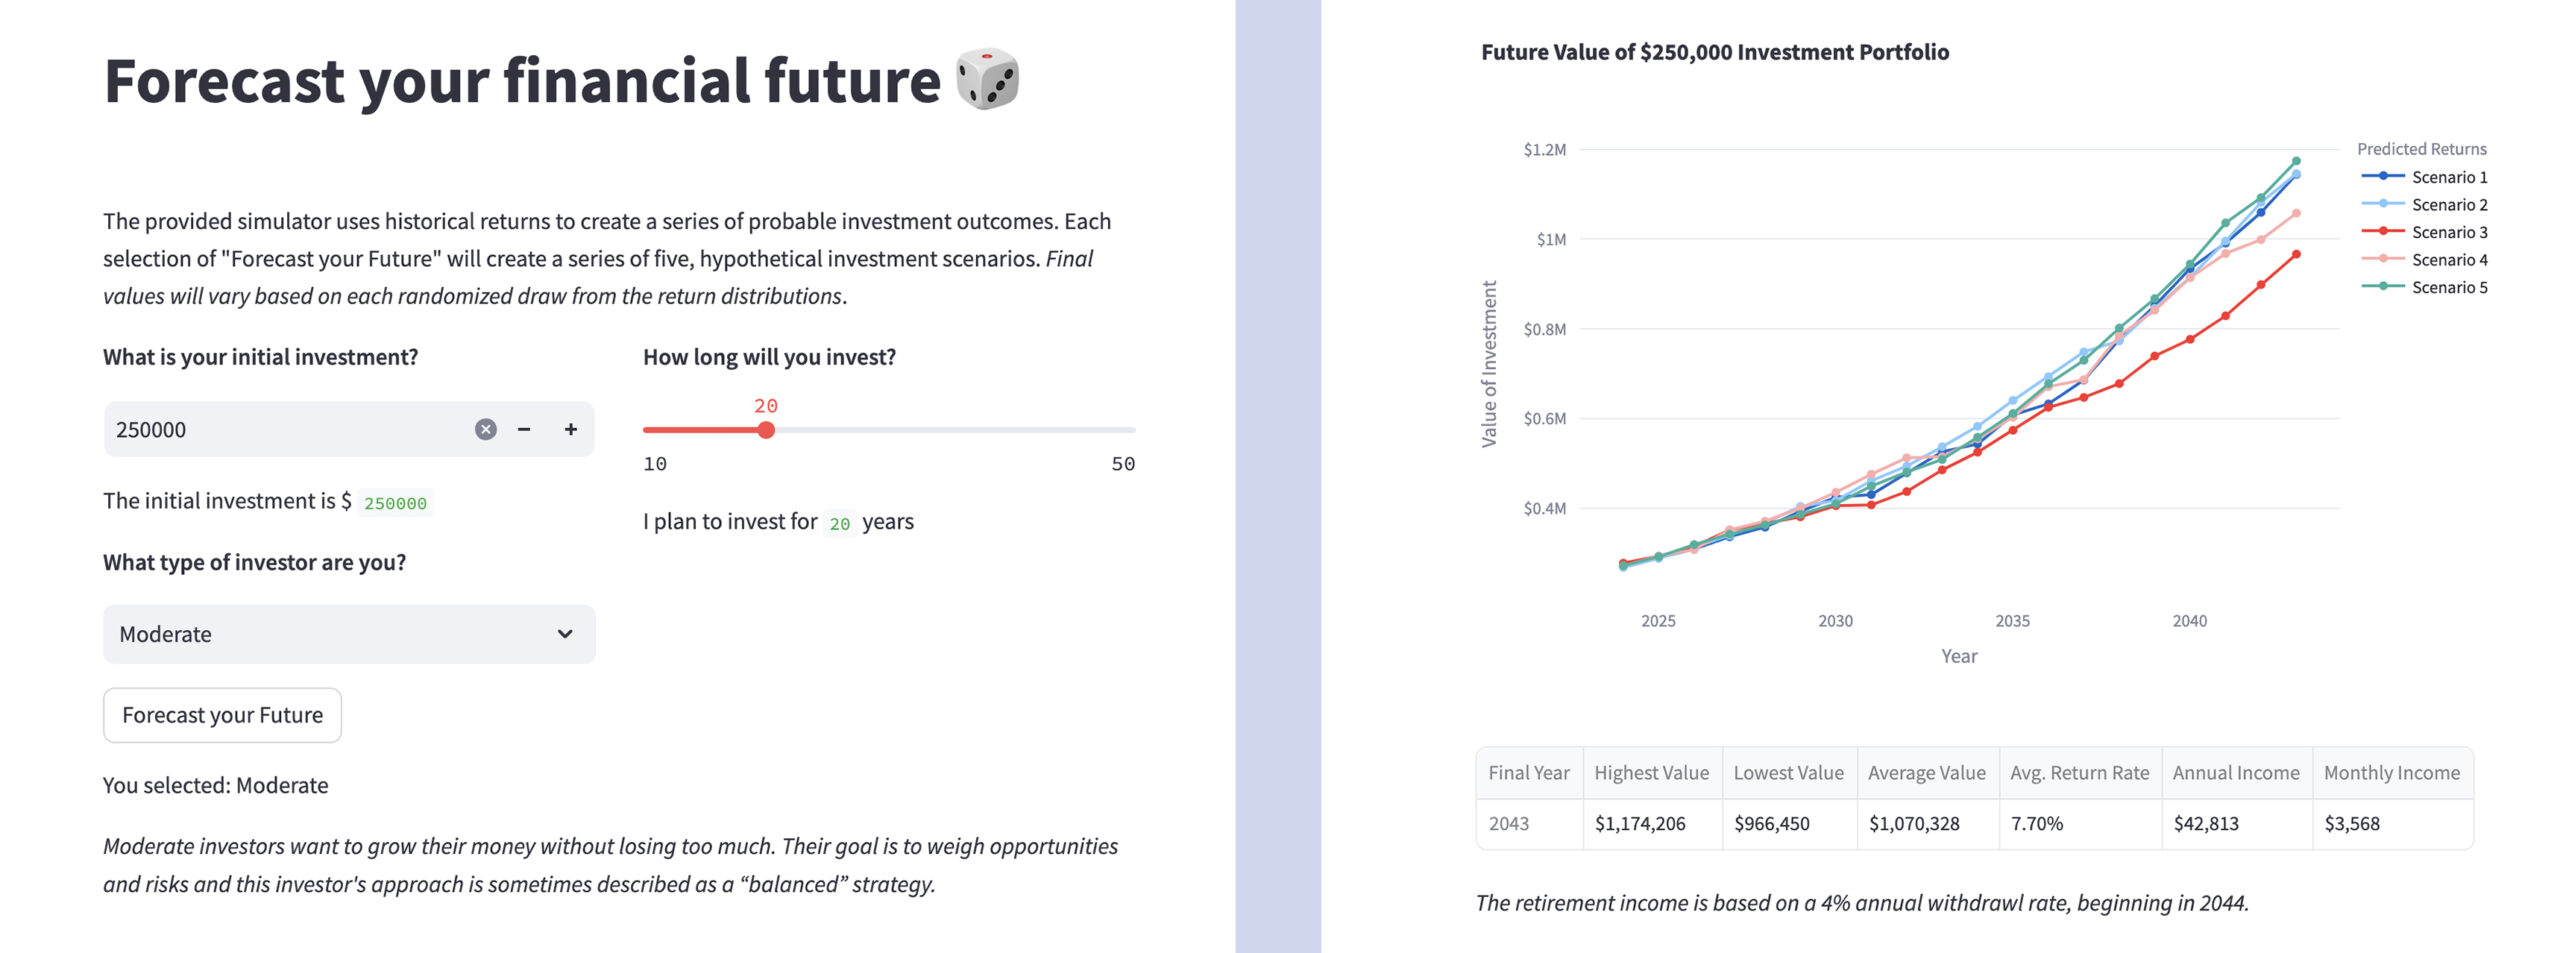
Controlling the flow of your app with forms
While implementing your created python functions, carefully plan out the logic flow of the user. For example, on the main page of the retirement app the visitor needs to enter an initial investment amount, the number of years, and the type of investor (which defaults to moderate).
I nested this section of the app in a streamlit form to prevent the user from submitting the “Forecast your Future” button without first entering inputs. In this example, the form utilizes an “if” statement, requiring the user to enter inputs before generating the plot and data table.
Without a form, this section of code would flag an error from the initial null values.
Controlling the flow with fragments
Streamlit apps run from top to bottom, continuing this loop endlessly unless you tell the app otherwise. For the income planning page, an empty list was created to allow the user to fill in varying retirement scenarios developed in the planner function.
During testing, the lists would continuously empty, which resulted from this circular loading. Streamlit created experimental fragments to allow the developer to effectively create a while loop within an application page.
With the @st.experitmental_fragment() declaration in place, the user can repeatedly repeat the planner() function without the empty lists at the top of the file clearing their entries.
Streamlit logic overview
The logic map below is meant to visualize the flow of actions within a Streamlit page. The page shown features the Retirement Income Planner page, as this content includes both fragment and form sections to control the page flow. The planner() function is fragmented into it’s own section, which then contains a form that allows the user to enter as many scenarios as desired. The sidebar includes a “Reset the Data” bar, as the table could get cumbersome and the user may want to start over.
Each page includes a function that serves as the main content for the page, which was modeled after the sample app. From a coding perspective, the function order is st.set_page_config (serving as the header) -> with st.sidebar: page specific side bar + side_content() -> *planner(): the main function for this page -> st.form: the form within this function -> footer(). As noted above, the *planner() function is allowed to loop because of the @st.experimental_fragment declaration.
Streamlit data app summary
Being able to bring your data projects into action is a rewarding experience. I hope my retirement app and this post inspires others.
If you found this page helpful, feel free to support me further via my Buy me a coffee flower page.